Color

I recently posted a picture of one of my most popular paintings, particularly near the coast, but it seems to be a popular animal just generally. It is an octopus. When I began painting, I had a friend ask me if I had ever painted an octopus. I hadn’t, so I went looking for reference photos. I found a lot of photos, but they were all brown or grey, not the eye-catching colors I really wanted. At the time I had never gone out on my own with artistic licensure to produce something different that the picture, or at least not making major changes, but I had decided it was time to try it. Here is the resulting painting:

When I shared this painting recently, I had a social media contact ask me if I had ever painted a sea turtle in similar colors, as she loved this painting, but also was looking for other animals that might match. Her suggestion was a sea turtle or a sea horse. I am always up for a challenge and have wanted to paint a sea turtle for a while now, so I decided to go looking for a reference photo. I found several that I liked. I have now come to the point that combining several paintings into one or changing the reference photo to look more pleasing to me anyway, has become a lot easier, so I went to work drawing and deciding how to use similar colors, as the reference photos again, were very muted yellows and browns.
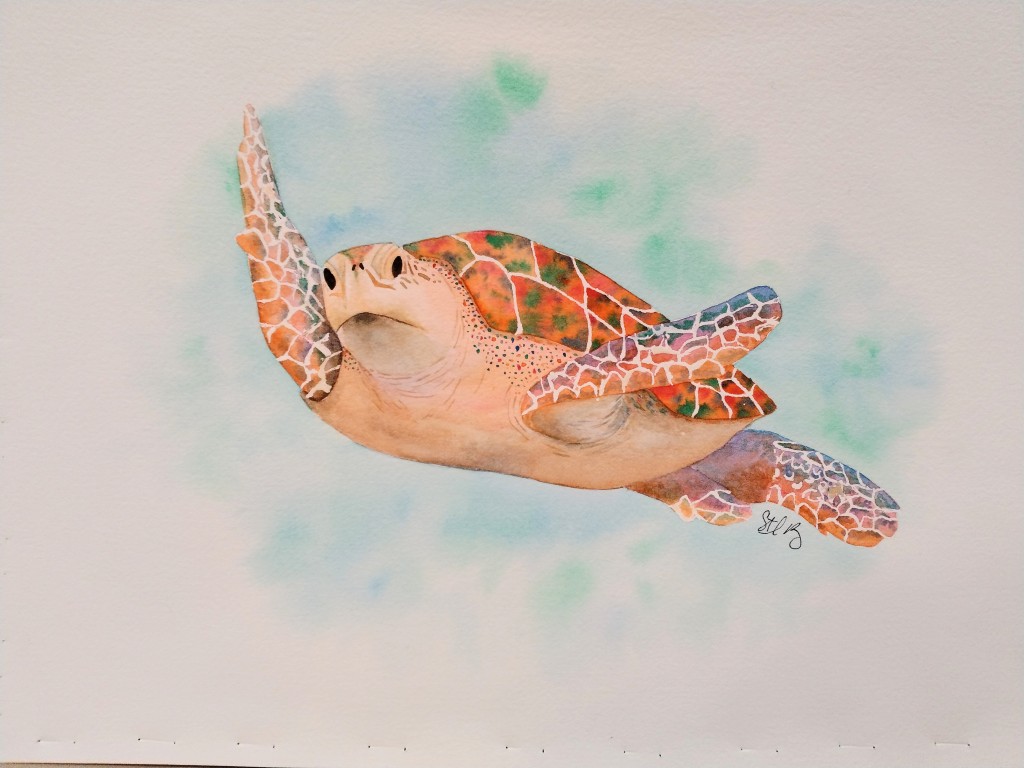
I love the colors. It’s not true to the natural colors of regular sea turtles, but it pops off the page well, and I think it will make a great art print, as well as nice note cards and stickers. I am especially looking forward to making it into fabric. This painting has not been digitized yet, so there will be some adjustments to exposure, brightening of colors and things of that sort, but all in all, I love this turtle. I am grateful for the people who suggest different subjects for paintings. In the summer I get several suggests a week and can’t paint them all. But I do enjoy the challenge, as well as understanding better what the customer is looking for. This was a fun project this week. Now, what to paint next …

View

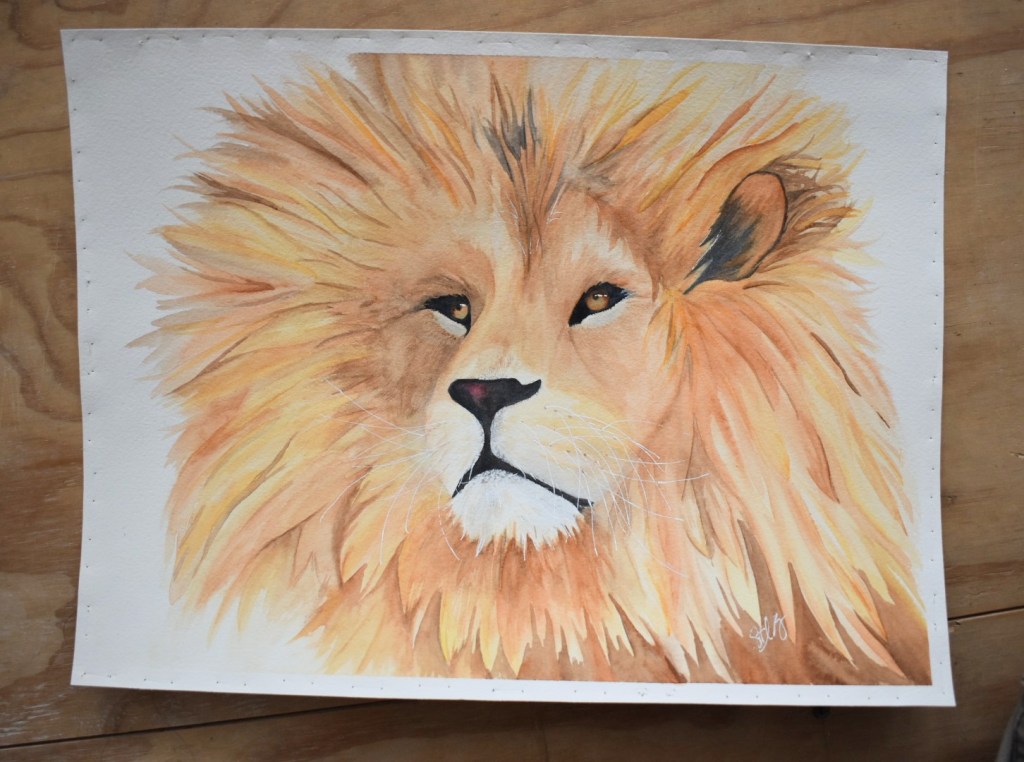
Recently I painted a picture of a lion. I didn’t like how it turned out, so I painted a second picture of a lion with a little bit different angle. I didn’t like that one either, so I put them upstairs where I see them every day. As I looked at the second picture over and over again, multiple times a day, I began to see things that I hadn’t seen when I first painted it. I began to like the picture. As I started to notice my change in perspective, I asked my family which one they liked the best. Their answers surprised me, as they were split on their preference. Some of them liked the first one I painted; some liked the second better.

Above are the two lions. The one on the left is the one I painted first. To me there is too much detail. But that is exactly what some of my family, and social media commenters really like about it. The one on the right is the second picture, and I feel like it has the right amount of detail, or lack of detail possibly, and a more realistic face. But really, it is up to the one viewing it to decide, not to me. This lesson I learned years ago, but it seems like I have to learn it with each new painting I paint as well.

Art is in the eye of the beholder. I used to put out for people to see, only the things that I liked. However, I would post on social media a large variety of the art I had painted. Often, the ones that I like the most were not the most popular and were not the best sellers. I began to take a much more varied sampling of my art when I realized this, and my sales increased. I learned from that experience that everyone finds different things beautiful. Some people really like more abstract art. That’s really not my thing, but as I have painted a few abstract pieces, the people who enjoy that kind of art buy it. I don’t add backgrounds to many of my paintings. I feel like they distract from the main focus. I especially don’t add them to my botanical style paintings unless the botanical is white. One day I had a young lady come to my booth and ask me why I didn’t add backgrounds. She was a painter herself and said that her favorite part of a painting to paint was the background. I found that interesting.

It is fascinating to me the wide variety of perspectives that we each have, and the wide range of likes and dislikes when it comes to art. Today I want to encourage you in three ways. Number one: don’t ever look at your art and assume that if you don’t like it, no one will. I bet that, for the most part, there is someone somewhere that will love it. Number two: share your art with people. Whether it be on social media, or just displaying it in your home for people to see. People will comment, and for the most part it will be positive comments. Some of what I thought were my worst practice pieces, that I had the courage to share, have become some of my best sellers. And number three: don’t throw away your art. Now, I have on occasion thrown a piece of art away. But for the most part I have almost all my originals. The thing I love about having it all, is that I can go back and see how far I’ve come. It is amazing to me that people were willing to support me in the beginning and that they liked what I painted then, because I can see so much improvement in my abilities by looking back. And, on occasion, I look back and think wow, I don’t know if I could even replicate that painting today. I would love to see art you have painted. And if you’re looking for some simple tutorials, head on over to my YouTube channel, and then send me a picture of your final painting!

Brushes

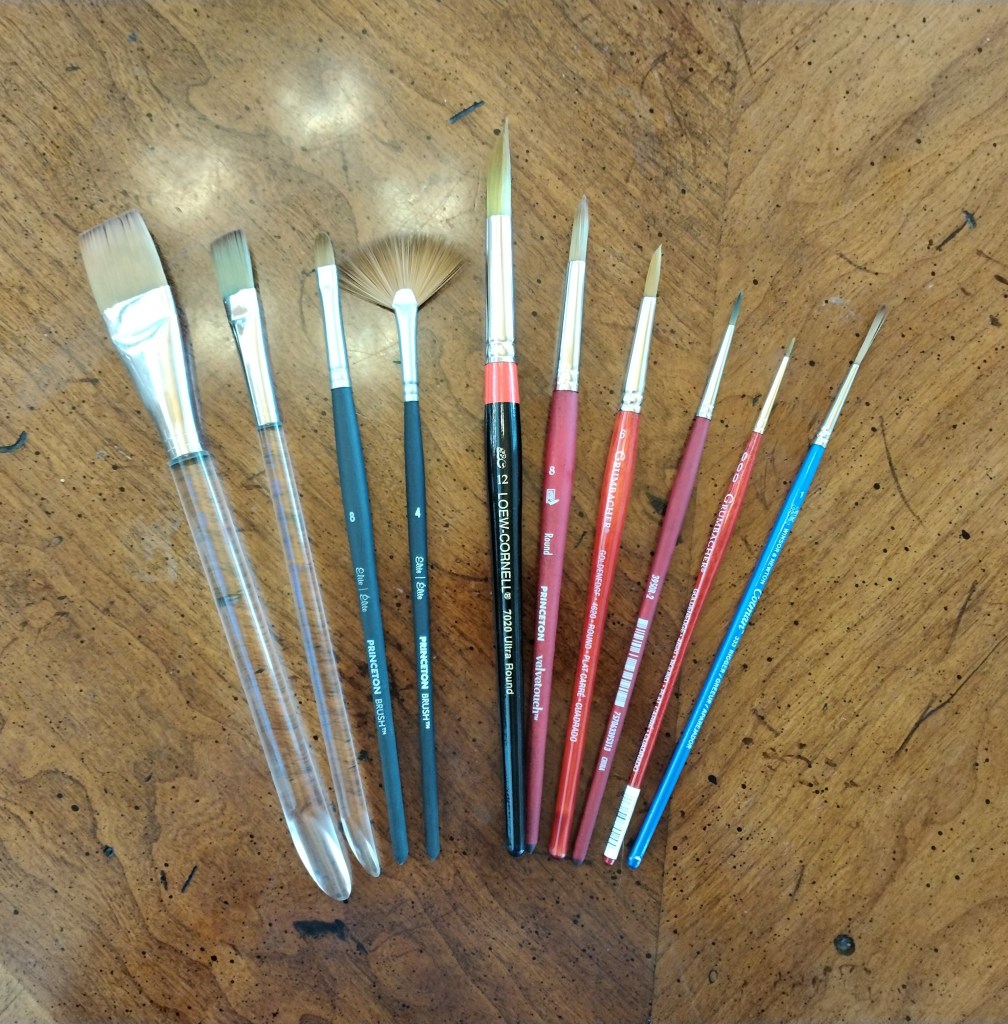
Paint brushes are obviously a very important part of painting. There is a lot of opinions on the best brushes to use, but I have found that most brushes work, it’s mainly what you get used to. I did not start out with very expensive brushes when I began, nor should anyone, as you may not enjoy painting. But as I have gotten better, I have begun to purchase a somewhat more expensive brush, however, not the top of the line either, as I think again, you can paint with about anything, and it’s what you get used to. As you’ll notice from the pictures below, I have a variety of brands of brushes. My current favorite is made by Princeton.

The above picture is a large portion of the brushes I use. There are a few in-between sizes that are not pictured. One thing to make note of is my brushes are short handle brushes. I have some for acrylic painting that have really long handles, but I find that they get in the way for the most part. Most of the watercolor brushes I can buy locally though are short handles, and I think that seems to be the trend now. They are much easier to use, and I feel like give me more control, especially for fine detail.

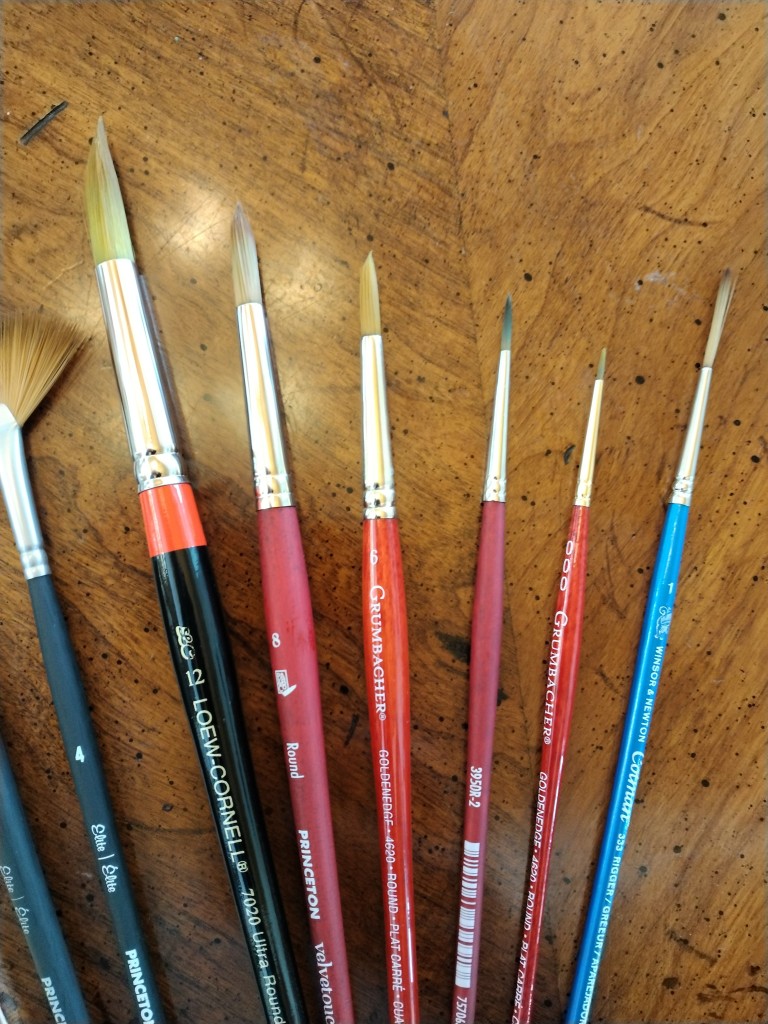
The brushes pictured above are flat brushes as you can see, and I use these least of all. But I do keep them on hand for a variety of reasons. The big one on the left I use for large washes on large pieces of paper. It works great to lay down a lot of water really quickly and get the color on just as quickly. This is super important when the air is really dry, usually in the winter here in Alaska, and helps keep the background really smooth. The second from the left I rarely use. It is nice for straight lines and removing paint, and I use it on occasion, but definitely not necessary if you’re just beginning. The third brush I use more often, for again, straight lines, but also to scrub out patches of color where I want it lighter, as well as to put down crisp water lines in landscape paintings. While I don’t use it a ton, I like the rounded edges better than the square one next to it, and I would suggest one similar before you get the larger square one. The last brush in the picture is a fan brush. Again, I don’t use this one often, but it works great for grasses in landscapes and fur on animals.

Now on to my workhorse brushes. I love round brushes for watercolor. I use most of these brushes in all of my paintings. Having a variety of round brushes to choose from is essential, but if you are beginning, go with the even numbers, 0, 2, 4, 6, 8. Those I use most often. The largest round that I have is size 12, great for large washes like the large flat brush, but doesn’t cover the area as fast. I usually use the large flat and size 12 round for large washes, wetting the paper with the flat brush and then painting in the background with the large round brush, especially if I have to go around anything, this size 12 brush comes to a great point for precision work. The other brushes are used based upon need and area that I am trying to cover but are used in every painting that I paint. The brush on the far right is a rigor brush. I don’t use it as often as the rest, but for fine lines and details it is essential. The bristles are quite a bit longer, so a little practice might be necessary to make it work like you want, but it’s an important brush to have on hand.

If you are thinking about painting, I would recommend trying brushes from a variety of manufacturers, and like you are doing here, look at different people’s recommendations. Also, look at the different styles of painting from the various sources of brush recommendations. You can see the type of painting I do by looking at my prints on my website, zoom in and look at the details, zoom out and see if that’s the kind of painting you would like to do. If so, maybe try some of the same brushes. The type of paper you use, and the quality of paints used also affect how your painting will turn out. You can check out some of my recommendations for those on some of my previous blog posts as well.

Forget-Me-Not Timelapse

For some reason Forget-Me-Not flowers have been on my mind lately, and with the large amounts of snow we’ve had over the last few days I have wanted to paint, just for the color associated. So, no wintery scenes for me yesterday, just blue forget-me-nots. This one, I decided to also record for a time lapse video for my YouTube channel Stephanie Richey Art. It took me about 2 1/2 hours to paint, but the timelapse is about 12 minutes. The first 2 minutes or so are not time lapsed, just so I can show you my supplies and the colors I used.

I will show you here some of the preparation steps that go into the process of the painting before I get to the point of painting. The first thing I always do is get a reference photo, or several reference photos actually. Unless it is my own picture or one that I have permission from the photographer to use. I love the site Pixabay for reference photos as they are copyright free photos and can be used for commercial or private use. But I still like to use a couple of reference photos. This step takes a while, sometimes the subject matter isn’t as common so there are fewer good pictures, but a lot of times I get distracted and start looking at other things. It’s a great place for ideas and inspiration.

The next step is to make a sketch of what I might like to paint. If I have a personal photo, I skip this step and usually just transfer over to the paper without the sketch. But I have found that the sketch helps me see the subject better, become more familiar with all the parts of the picture, and, if it’s a large, complicated painting, the sketch helps me remember which parts are which so when I go to paint it, I don’t paint a leaf the color of the petal, or fill in the background with a foreground color accidently, and mistakes like that.

The image above is the original sketch that was drawn in pencil. I then outline with a fine tipped sharpie once I am pleased with the sketch, so that it is easy to see and then decide if I like the size. Some pictures I will sketch the actual size, this one I used a scrap piece of cardstock and sketched it on that, knowing I would have to enlarge the image when I was done. I will usually draw the image no bigger than a regular sheet of paper because I like to keep the sketch for possible use or reference later. At the very least I will copy the image to a different piece of paper for transferring onto the watercolor paper. This one I decided to enlarge so that it filled more of the 8×8 inch watercolor paper I was using. The below picture is the original outlined in sharpie, and the enlarged picture below the original sketch.

I then scribble on the back of the copied and/or enlarged picture with a regular pencil so that when I place it on my watercolor paper, I can trace the image on the right side, and it will transfer over to the watercolor paper. Usually it transfers fairly light, sometimes I have to go over it with a pencil to see specific details, but more often I have to go over it lightly with an eraser to lighten the lines, so they don’t show through in the finished piece. For this painting I used a Windsor Blue, Yellow Ochre, Permanent Rose, Sap Green, and a little bit of Lemon Yellow in the centers, as well as a hot press paper, as it gives the petals a much smoother look than a cold press, which would make a grainier looking painting.

My cheap phone camera really doesn’t take very good pictures, but I’ll digitize it later. I love these pretty forget-me-nots. I really enjoyed the color as a change from the white, white snow. And, as the title of this post indicates, I have a timelapse of this painting on my YouTube channel as well: Forget-Me-Not Timelapse

Palettes

For today’s art blog post, I am going to talk about the palettes I use, and which ones I like best. Several months ago, I talked about the watercolors I use, so today the palettes. The different types of watercolor paint do somewhat determine what palette, so I might go into that a little bit, but if you want to know which types of watercolors I like best, you can read about those preferences here.

I use 2 different types of palettes, based upon the material they’re made of, with a large variety of shapes in the two material types. I started off with a plastic palette, the one most commonly available at art stores as well as big box stores like Wal-Mart. This palette is plastic. It is light weight, and there is ample room for a large variety of paint colors and space for mixing. I don’t generally use this palette anymore unless I am in need of more space for colors for a specific project, or if I have two projects going at once, I like to maintain one palette for each so that I don’t get the colors mixed up. I dislike the plastic palette because, as you can see, the paint stains the plastic. Sometimes this makes it difficult to determine whether or not the color you have mixed is the true color. Testing on a piece of scrap paper before painting it on the picture is critical with this palette. The plastic palette is the one on the left in the image below.

My preferred palette for painting at home is the one on the right. This is a ceramic palette, set up very similar to the plastic one. The biggest difference between the two is that the ceramic one cleans completely. Every time I clean out my palette, I have a fresh white surface to begin with. This also means that all the colors are true to their color in the palette. I still use scratch paper to test the colors intensity, but I know what color I have by looking at it in the palette. I have also run the ceramic palette through the dishwasher. The plastic one is thin enough that I worry it might warp in the heat. Both palettes come in a variety of shapes and sizes. If you choose a plastic palette, one tip would be to scratch the mixing surface with some steel wool or fine sandpaper. Otherwise, when mixing, the paint sticks to your brush better than it does to the palette which makes mixing frustrating.

I found these little round ceramic palette dishes online and decided to try them. They are stackable and come in a set of 5 dishes and a lid that could also be used as an individual paint dish, however the lid does have a domed top, so it doesn’t sit flat like the rest of the pans. These pans are about 3 1/4 inch in diameter. I like these for colors that I will be using across several painting. I can put some in the pan, use what I need, stack it out of the way and pull it out for the next painting. I also like them for one- or two-color paintings where I don’t need my bigger full palette. These also wash clean and white. I have never run them through the dishwasher, but I imagine that you could.

These last palettes are travel palettes. I don’t often use the pan sets at home, but they are super convenient when I go places. They are often with me in the car when I go with my kids to their various activities where I know I will be waiting for a while. The two on the outside are plastic, the one in the middle is metal. I dislike the water brushes that are included in the plastic ones, and really like that I can put regular paint brushes in the metal one. But I like the different colors in the pans that I may not normally buy, the one on the right in particular, are all a metalic type paint and have sheen to them even when they dry. I would not have gone out and bought tubes of all those colors, but I have used all the colors in several paintings while waiting for boys and it’s a fun change. The metal palette in the middle is different from the ones on the outside as it doesn’t use the watercolor pans. I use the tube paints in the pans instead. It came with enough empty pans to fill the palette, so I have a lot of options.

I hope you enjoyed this review, and that it helps you when you choose your own palettes to paint with.