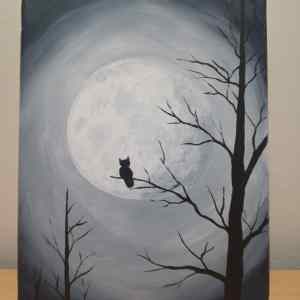
I know this is not on a Wednesday or Sunday, but I have a couple of tutorials on my YouTube channel that would benefit from some supply lists. There are 2 different tutorials, one acrylic and one watercolor, so I will give a separate supply list for both. Both videos are a 2 part series, so the links above link to part 1. I will put a link at the bottom again for both parts 1 as well as part 2 of each video.

This is the Acrylic Harvest Moon. The things you will need to paint this picture are:
Canvas – It can be a wrapped canvas, or canvas board. I used an 8×10 wrapped canvas for this painting so that it would fit in the frame of the video well. But you could use a larger or smaller canvas and it would work just fine.
Paint – I used 3 colors for this painting, White, Payne’s Grey and Mars Black. If you wanted to reduce to 2, you could use the Mars Black for both the background and the silhouettes. You would need to lighten the black for the background to make it more of a grey for the most part as you want your silhouette’s to stand out. In the watercolor tutorial I used a blue in the sky as well, and you can add that to the acrylic if desired.
Brushes – I used a 1/2 inch flat brush to paint in the background. If you make a larger version you may want a larger brush, but it’s not necessary. I used a couple of smaller brushes for the silhouette’s, they were more of a flat brush, but a round brush would work well for the silhouettes as well.
You will also want to have a couple of paper towels handy, and water to rinse your brush once in a while. But you don’t want to use the water with the paint. Before dipping into the paint after rinsing, dry your brush on a paper towel. Those are the things I used in the acrylic painting.

This is the Watercolor Harvest Moon painting. I did 3 other’s with different silhouettes. The moons in each one are different as well, so go to my Instagram page to get some ideas of other types of silhouettes. The supplies you will need for this one are:
Paper – I used 140lb cold pressed Arches watercolor paper, that measured 8×8 inches. I like the cotton paper versus the less expensive pulp type papers as they hold water better, and the paint colors are more vibrant. I used a watercolor block that is sealed around the edges, so there is no need to tape it down. However, if you are using a single sheet of watercolor paper you will need to tape it down, either to your table (I don’t like this method as it can’t be moved as I paint), or tape it down to something like a piece of cardboard (not cardstock, that’s not heavy enough) or foam board.
Paint – I used 2 colors for this painting, lamp black and Prussian blue for this particular painting, but on the other 3 I used a lighter blue. If you’re using blue, just about any blue will work. A purple color would also look nice, but you don’t have to use the blue at all, and can just do a monochromatic painting with the lamp black, and it will look nice as well.
Brushes – I used round brushes for the majority of this painting. The size doesn’t matter as much as the ability to cover the paper quickly with the wash and initial background color. I think the big brush I used was a size 16. Everything else was done with smaller round brushes, use ones you feel like are easy to handle, and come to a good point for the smaller details. I used a rigger brush for the thin lines of the small tree branches.
As with the Acrylic, you will need to have water, but unlike the acrylic, you will use a lot more water with the watercolor. You will also need to have a couple of paper towels and 2 jars of water, one for rinsing your brush, and one that stays clean for your washes.
I hope you take the opportunity to paint these pictures! I would love to see your finished product as well, so drop me a picture in the comments here, on my Instagram page, or on my YouTube channel.
